
 |
| See below for an easy step by step instructions for this eye look |
When I think of the holidays, I think bright and sparkly and glamorous. This is what inspired this makeup look.
I have outlined step by step instructions to achieve this eye look below.
Always remember that when it comes to makeup, it has everything to do with blending the lights and the darks to create an illusion and to trick the eye to make something look larger or smaller.
 |
| Step 1 |
Step 1 - Prime eyelids from lash line to below eyebrow. With a fluffy eye shadow brush use a flesh tone eye shadow and apply all over lid. I used Urban Decay Primer Potion to prime the lids and I used MAC Studio Fix Powder as the base colour all over the lids.
 |
| Step 2 |
 |
| Step 3 |
Step 3 - Wipe off any product from the previously used angled eye shadow brush. Using that brush apply a matte black eye shadow on the crease over the taupe/light grey colour. The black should be placed tighter than the previous colour and not as blended or spread out as the the previous colour. You are trying to achieve a gradient look from dark (black) to light (taupe/light grey).
 |
| Step 4 |
Step 4 - Using a clean dense eye shadow brush carefully apply a gold/silver/rose gold pigment on the lid filling in the space below the black crease. Please note that you will have to pack the pigment on by pressing it on the lid. If you use a blending motion, the loose pigment will end up everywhere! (Not cute). I used a pigment because I find that they give the most beautiful sparkle.
 |
| Step 5 |
Step 5 - After applying the pigment, go over the crease with the black to make it darker. This will make the pigment stand out more and also will help clean up the crease if you happened to get any pigment on there.
 |
| Step 6 |
Step 6 - Using a gel or liquid black eye liner, line your lash line and wing it out on the ends. If you are not comfortable with winging out the liner, you can stop the line at the end corner of your eye, or skip the liner step all together.
 |
| Step 7 |
Step 7 - Using a black pencil eye liner, tight line your water line. Tightlining means to line both bottom and lower waterlines. This technique really helps to define the eyes and make them stand out.
 |
| Step 8 |
Step 8 - Grab your favorite pair of false lashes and put them on using an eyelash adhesive. Make sure to apply the lashes as close as you can to the lash line. This will give the best results. Finish off by binding the false lashes to your real lashes with one coat of your favourite mascara after the glue dries.
As you have noticed, I like to start makeup with the eyes first. This allows me to clean up any fallout from the eye makeup without worrying about wiping off concealer or foundation.
 |
| Add glitter the centre of the eyes for an extra sparkly look if you wish. |
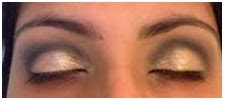
The Finished Look


Absolutely beautiful!
ReplyDelete-Ritu